 The F’acebook Virus – Facebook Anti Virus Removal
The nasty virus called F’acebook Virus (notice the spelling), has been infecting people on Facebook recently. The virus is obviously of the typical sort – download a file into your computer’s registry, and then it reeks havoc your entire computer (functions, speed, efficiency, etc…).
Removing the F’acebook virus:
The F’acebook virus, just like any other, infects your computer. So the removal of the F’acebook virus can be handled like any other virus on your computer.
As I’ve mentioned in previous articles, the best program I have found to remove any virus, malware, or problem from your computer is with the Malwarebytes software program.
Here’s a step by step guide for removing the F’acebook virus from your computer using Malwarebytes:
1) Download Malwarebytes to your computer (click here to download).
You’ll be taken to the CNET site where you simply click the “Download Now” link.
2) Once you clicked “Download Now”, you will be asked to save the file to your computer. I recommend you just save it to your desktop for easy access.
This is an executable (.exe) file that you are downloading, which means once it’s downloaded, you’ll need to execute it (install it).
3) Now that you’ve downloaded the .exe file (named “mbam-setup.exe), you need to go ahead and open (or double click the .exe file, depending on what browser you are using), and this will now install the Malwarebytes software onto your computer.
Don’t worry, this program is 100% safe and you can remove it once you are finished. However, I recommend you keep it on your computer for future use – because you never know when you need to remove a virus.
4) Go through the process of downloading and installing Malwarebytes onto your computer. You’ll be taken through various screens where you’ll have to accept terms, click “next”, etc…
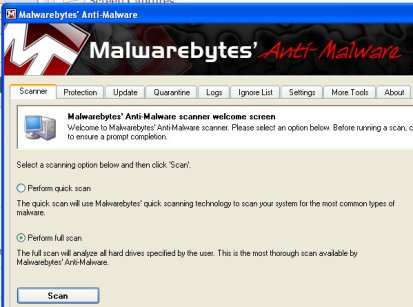
You’ll know you’ve successfully installed Malwarebytes when you are finally presented with a dashboard that looks like this:

5) Selecting the right scan option:
The default selection under the Select a scanning option…. is “Perform full scan”.
There have been very few instances where I’ve had to perform a full scan to remove problems from my computer.
So I recommend clicking the “Perform quick scan” option first to see if that removes the Koobface worm.
6) Now go ahead and click “scan”
If you’ve selected the “Perform quick scan” option, then your computer will scan for about 3 – 5 minutes.
If you’ve selected “Perform full scan”, then your computer will scan for about an hour or so.
7) As your computer is scanning, you’ll see in red letters the number of viruses that have been found.
This is called “Objects infected: XX”
You need to just let Malwarebytes continue its scan until it finishes.
8) Completing the removal of Koobface
Once Malwarebytes is finished scanning, you’ll be presented with a message that says “Scan has completed”.
Click “OK”
Next, you want to click the option called “Show Results” (lower right hand corner).
Once you click “Show Results”, you’ll now be looking at a list of all infected objects found on your computer.
Make sure all of the objects have a checkmark > then click “Remove Selected”
You’ll be presented with a Notepad document showing you the results of your scan. You can save that if you like – I never do….
9) Restart Your Computer
Finally, once you’ve completed all the steps above, all you need to do is restart your computer.
3 replies on “Facebook Anti Virus Removal – “F’acebook Virus””
i am femimutar, i need your help any time that u people have good software anti virus so that i can be your client on line